
Data ingestion with dlt and Dagster: An end-to-end pipeline tutorial
Ingest Data from Bluesky API to AWS S3 Using dlt and deploy it on Dagster in Just 15 Minutes.

In our previous post, we introduced the data load tool (dlt) by , a Python library that simplifies data ingestion by making it easier to work with different data sources and destinations. We covered the basics of using dlt and how it makes ELT processes more efficient.
If you missed it, you can catch up here:
Introduction to data load tool (dlt): A Python Library for Simple Data Ingestion

Are you struggling to handle the complexity of ingesting data from multiple sources into various destinations? Or are you tired of the non-user-friendly import data features of different systems?
This post provides a step-by-step tutorial on using dlt for an end-to-end data ingestion pipeline, covering the following steps:
Ingesting data from the Bluesky API.
Storing data in S3 as Parquet files.
Deploying the pipeline with Dagster for scheduling and management.

This workflow can serve as an excellent starting point for a portfolio project, showcasing skills in data engineering and pipeline management. All the code used in this tutorial is available here1.
Before diving into the practical steps, let’s briefly cover the source (API), destination(S3), and why we chose Dagster as the orchestration tool.
Bluesky

Bluesky is a new social media platform created by Jack Dorsey, co-founder of Twitter, as an alternative to X (formerly Twitter). It has grown quickly and now has over 20 million users.
In this example, the SearchPosts endpoint is used to find posts that are tagged with #dataBS and #datasky, which are popular tags among Bluesky's data and AI community. These hashtags offer insights into discussions on data data and AI. For more details about the Bluesky API, see [link2].

S3
.png")
In this example, the focus will be on AWS S3, a popular choice among data engineers for its scalability and reliability. However, other providers or even local file systems can be used, depending on specific requirements.
For more details on using other cloud providers, visit: dlthub filesystem documentation3
Dagster

Dagster is a powerful tool for building and managing data pipelines, enabling the creation, scheduling, and execution of tasks to maintain data assets such as tables, datasets, and reports. By defining tasks as Python functions, Dagster ensures they run at the right time and supports workflows like ETL/ELT and ML pipelines. Its seamless integration with tools like Pandas, Spark, and SQL simplifies testing, monitoring, and debugging.
For advanced orchestration, Dagster Cloud provides enterprise-level features such as serverless or hybrid deployment, native branching, and built-in CI/CD, offering a scalable, infrastructure-free experience for developers.
When paired with dlt, Dagster further streamlines pipeline orchestration, combining data extraction, loading, and efficient management into a cohesive workflow. For more details, see native integration with DLT4.
Note: This tutorial uses the open-source version of Dagster.
Getting started with the pipeline
0. Prerequisites
dlt requires Python 3.8 or higher and the pip package manager for installation. It is highly recommended to use a virtual environment to manage dependencies effectively. For detailed instructions, refer to the dlt installation reference5.
Additionally, ensure that S3 is set up in your AWS account, and have your access key and secret key readily available. For guidance, check the AWS S3 Getting Started Guide6.
1. Installing dlt
To get started, you'll need to install the
dltlibrary along with the correct extras for the Local Filesystem destination.

The
dltCLI offers a handy command to help you get started with any combination of source and destination. In this example, we want to load data from a REST API to the A cloud filesystem. Start by creating a new directory and initialising your pipeline with the selected source and destination using the following commands.

Once complete, your project directory should have the following structure:

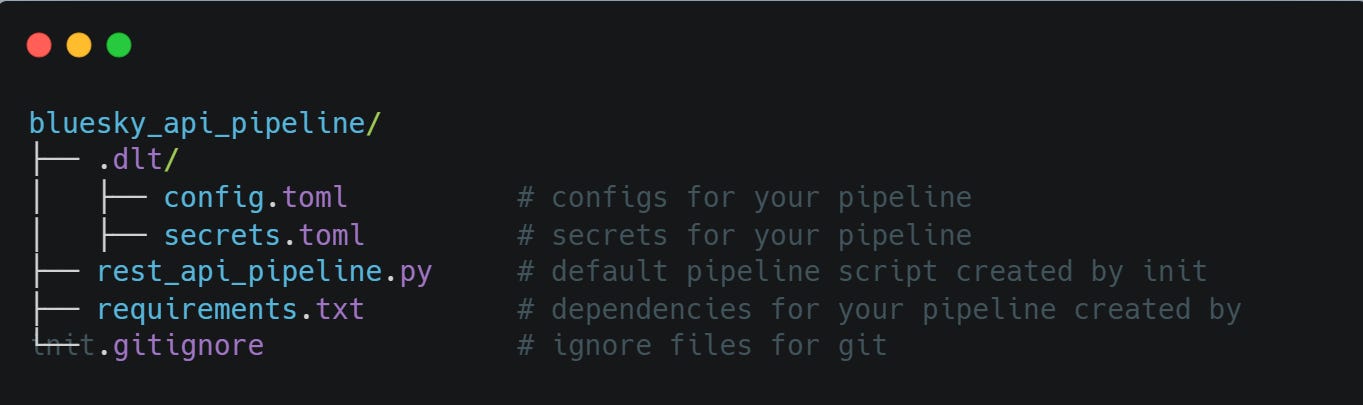
2. Configuring the source and destination credentials
When you initialise your pipeline with the dlt init CLI, a .dlt directory is created within your project folder. This directory contains two essential files:
config.toml: For pipeline configuration.secrets.toml: For securely storing credentials.
config.toml

This file holds the pipeline settings. By default, most configurations are generated automatically, except for [normalize]. You can review and adjust these settings as needed.
For instance, to store data in Apache Parquet format, you can set the loader_file_format option. Apache Parquet is a widely-used, open-source columnar storage format, ideal for efficient data storage and retrieval. dlt supports Parquet when properly configured.
To enable Parquet storage:
Modify the
loader_file_formatsetting inconfig.toml.Install the required
pyarrowpackage.

For detailed instructions on configuring Parquet with dlt, visit the dlt documentation on Parquet7.
secrets.toml
This file securely stores your credentials and is generated with placeholder values during initialisation. To configure your pipeline, open .dlt/secrets.toml and fill in the placeholders with your actual credentials. The structure of the file typically looks like this:

3. Configuring the source (API) and your pipeline:
dlt simplifies data extraction from REST APIs through straightforward configurations for endpoints, pagination, and authentication.
In this example, we use a public API that doesn’t require authentication. The parameters are configured based on the API documentation, with since and until set to extract yesterday's data. Adjust these parameters as needed to fit your requirements, such as specifying different time ranges or adding other query settings.
For more details about the API, refer to the API documentation8.

As you might have noticed, we used @dlt.source because it is required by Dagster. If you're wondering what a source is, in short, a source is a function decorated with @dlt.source that returns one or more resources.
In our upcoming posts, we will explore @dlt.source and @dlt.resource in detail, including how they work and best practices for using them however if you like to learn more please check source, and resource documentation.
In dlt, the write disposition specifies how data is written to the destination. Since we haven't explicitly defined it in our code, it defaults to Append, which is the standard behaviour.
In our upcoming posts, we'll explore different write disposition options, such as Replace, Merge, and others. If you're eager to dive deeper, feel free to check out the detailed dlthub documentation here.
4. Run the pipeline
With everything configured, the pipeline is ready to run!


Once the pipeline is executed, you'll see the following folders in your S3 bucket:

Let's take a look at an example of what is inside the 'posts' table:

Notice how dlt automatically organises the data into separate folders. It's a testament to how seamlessly dlt manages data storage and structure. Curious how this works? We'd love to hear your thoughts!
You might also observe three additional folders: dlt_loads, dlt_pipeline_state, and _dlt_version. These folders are created to store pipeline metadata, such as load state and versioning, which dlt uses behind the scenes to ensure smooth pipeline operation.
In upcoming posts, we’ll take a deeper dive into these metadata folders, exploring their role in pipeline management.
b) Orchestrating dlt pipeline on Dagster
Orchestrating a data pipeline is crucial for automating data flow, and ensuring consistency, scalability, and efficiency. It minimises manual intervention, handles errors in real-time, and improves monitoring and tracking. This approach makes data processing faster, more reliable, and easier to manage.
Step 1: Install Dagster

Step 2: Set up a Dagster project:
Create a new directory and scaffold the basic structure for your Dagster project. This will generate the default files for Dagster that we will use as a starting point for our data pipeline.

The dagster project scaffold command generates the default folder structure, including essential files like pyproject.toml and setup.py, providing a starting point for your pipeline.
After running the command, you'll see the following structure created:

Step 3: Configure the directory structure
Move the
.dltfolder, containing credentials and configuration files, to thebluesky_postfolder.
This ensures that DLT can access the required information for the pipeline.

Step 4: Create the pipeline
In the bluesky_post folder,
create an empty Python file called bluesky_posts_dagster_pipeline.py

and move all of the code from bluesky_posts_pipeline.py to bluesky_posts_dagster_pipeline.py except the dlt.pipeline( ) and dlt.run( ) part.

Dagster assets replace the need to explicitly run the pipeline. Instead, the pipeline logic is set up directly in assets.py.
Step 5: Set up asset.py
In Dagster, an asset represents a piece of data (e.g., a table, file, or dataset) that is tracked, versioned, and processed.
Use the @dlt_assets decorator to define the pipeline:
dlt_source: Specifies the data source (e.g., Bluesky API).dlt_pipeline: Defines the pipeline to extract data from the API and load it into S3.
Step 6: Set up the definition.py
Definitions in Dagster describe the structure of your workflow, including computations, assets, and resources. In definitions.py, include the assets and resources in a Definitions object to organise your pipeline for execution. This allows Dagster tools to load everything you’ve defined.

Step 7: Install project dependencies
Install the necessary dependencies using the following command:

We use -e to install dependencies in editable mode9. This allows changes to be automatically applied when we modify the code.
Step 8: Start Dagster and access the UI

Navigate to localhost:3000 in your browser to see the Dagster UI. This command will keep Dagster running until you stop it (press Control+C in the terminal).
Step 9: Run the pipeline
Now that you have a running instance of Dagster, you can run your data pipeline.
In the Dagster UI:
Go to the Assets page.
Click the Materialize button to execute the pipeline.

You will see the following logs in your command line:

During materialisation, the logs will display stages like Extract, Normalise, and Load, a process you might recognise from the previous post.
Conclusion
This post guided you through creating a data pipeline using dlt, to ingest data from Bluesky API to AWS S3, and deploy it on Dagster. We covered everything from setting up the tools to configuring and running the pipeline efficiently. If you found this helpful, let us know what you'd like to see in future posts.
In our upcoming dlt series, we'll dive deeper into sources, resources, write disposition, and much more. Stay tuned for the details!
Also, check out our other posts on 10 pipeline design patterns and Data ingestion for more insights!


Further Resources
For more details on Dagster and its integration with dlt, we highly recommend exploring the following posts.
“Airflow vs Dagster vs Kestra” by

“Dagster deployment (Workshop: Python ELT with dlt from Zero to hero)” by
: [Youtube link]
https://github.com/pipelinetoinsights/bluesky-to-dlt-pipeline
https://docs.bsky.app/
https://dlthub.com/docs/dlt-ecosystem/destinations/filesystem
https://docs.dagster.io/integrations/embedded-elt/dlt
https://dlthub.com/docs/reference/installation
https://docs.aws.amazon.com/AmazonS3/latest/userguide/GetStartedWithS3.html
https://dlthub.com/docs/dlt-ecosystem/file-formats/parquet
https://docs.bsky.app/docs/api/app-bsky-feed-search-posts
https://pip.pypa.io/en/latest/topics/local-project-installs/#editable-installs